
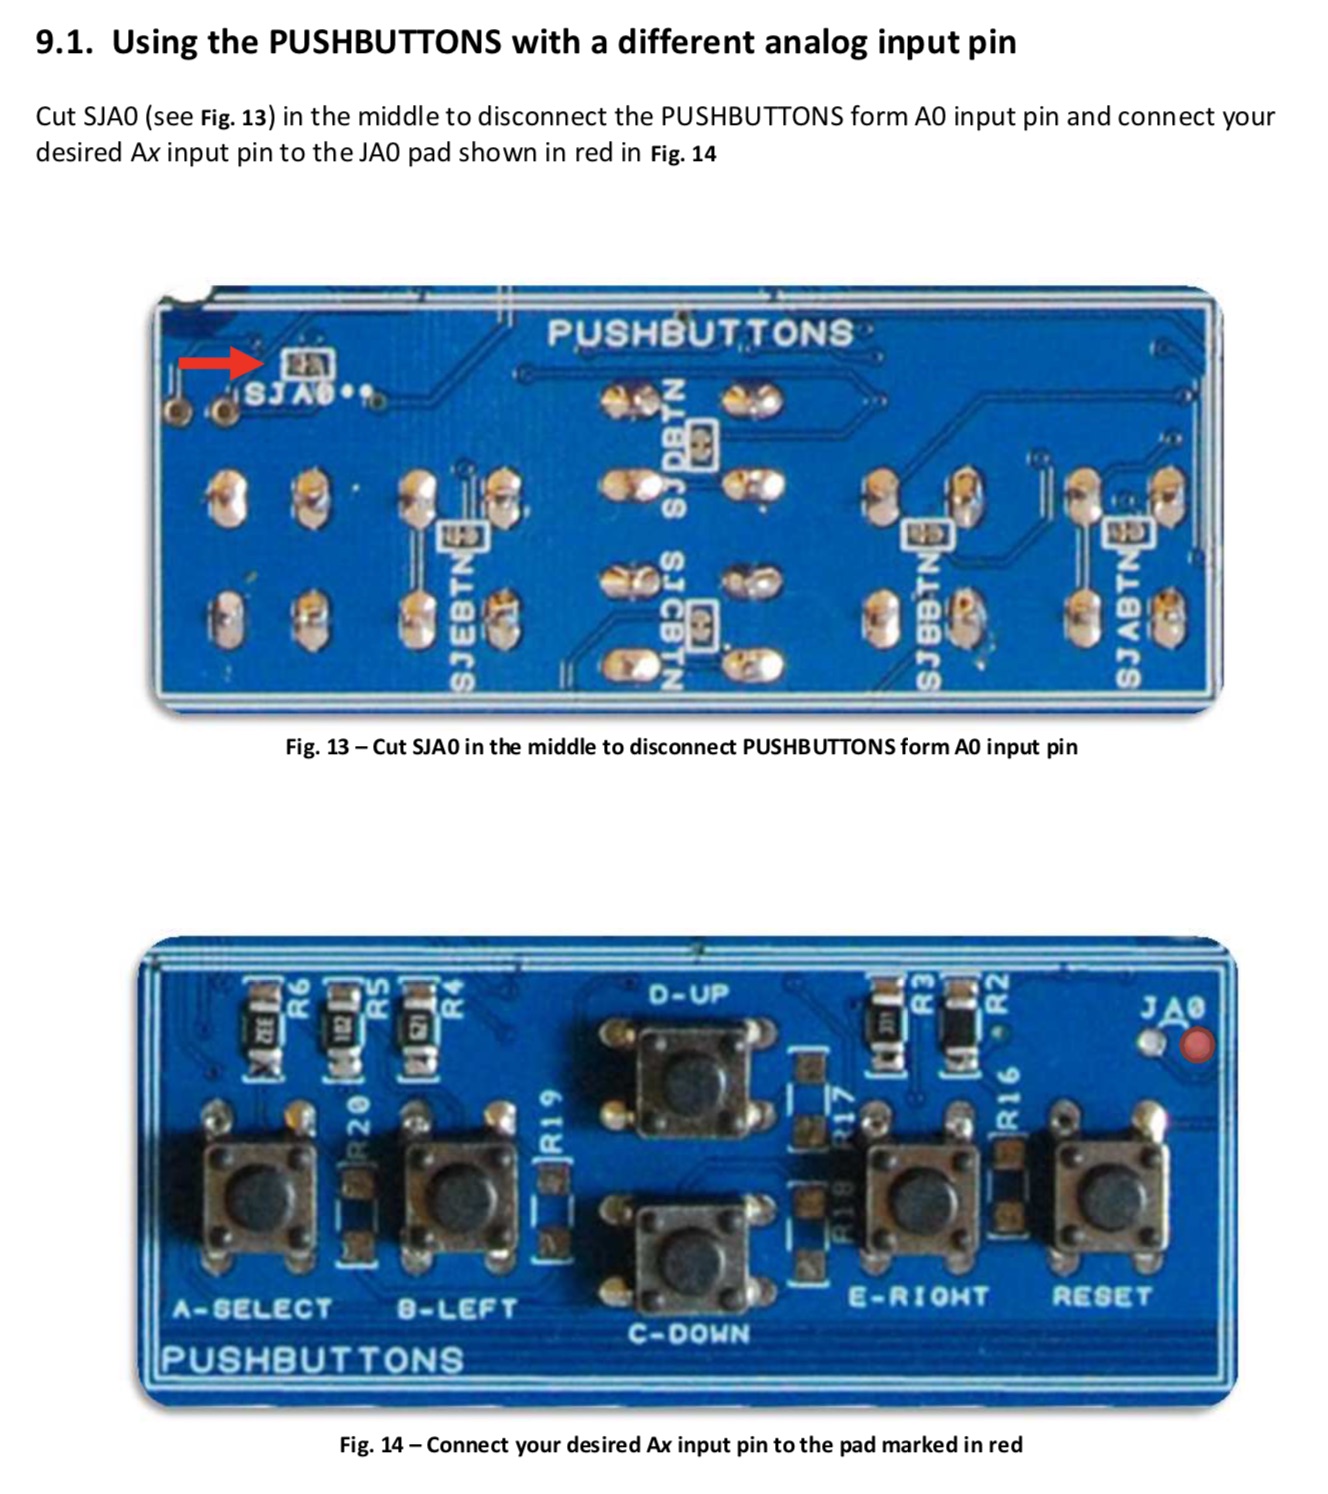
Hardware: Mk I Starter Kit (2017-2018)
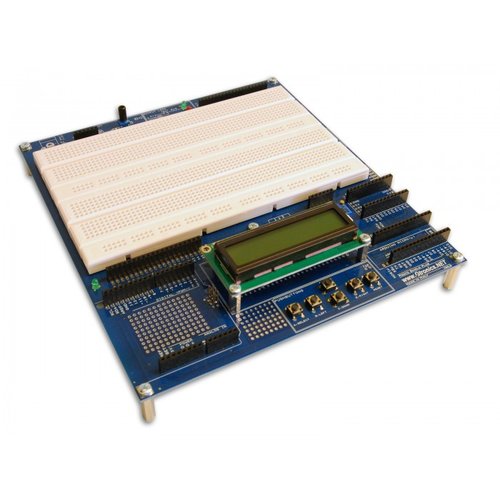
For 2017 and 2018, we have based the Biomaker Starter Kits and Tutorial Hardware on the Gtronics Protoshield Plus, used as a base for Arduino development.
Giant Prototyping Board for Arduino
The Protoshield Plus has a number of attractive features:
The Gtronics Proto Shield Plus allows you to plug in Arduino boards, and to integrate these with custom shields and components on a large plug board - minimising tangled hook-up wires. On-board push buttons and a LCD are provided to facilitate debugging of program flow and to interrogate hardware during testing.
The Gtronics Protoshield Plus works with a wide variety of ARDUINO / GENUINO boards: UNO, LEONARDO, YÚN, NANO, MICRO and MINI. It has a LCD 1602 display module with I2C PCF8574 I/O expander provided on-board (drive LCD with just 2 pins); 5 pushbuttons and a reset button are provided on-board; 2 solderless bread-boarding areas 740 contact points each (total 1480 points); More than 400 soldering pads for additional prototyping parts;
IN / OUT / POWER pins duplicated near the bread-boarding area for easy connection; 2 Output LEDs and 1 potentiometer with knob provided on-board. Wired sockets for a servo connection, an external 7-9VDC power supply, and additional ICSP connector to use NANO and MICRO with standard shields, and additional holes let you to create shields with standard 2.54mm breadboards.
As well as the Gtronics Protoshield Plus, we have provided an ARDX Learning kit, Sidekick component kit, Seeed Grove Starter kit for Arduino and a 3.2” Gen4 intelligent display from 4D Systems - for each of the Biomaker 2017-2018 Starter Kits. For more details, see the 2018 Starter Kit page.


Modification of the Protoshield Plus
The Gtronics Protoshield Plus board provides a very flexible platform for prototyping new circuits. It includes a number of components that connect to digital and analogue ports on any Arduino board that is plugged into the Protoshield Plus. In order to use the Protoshield Plus with third party shields loaded with additional components, it is sometimes necessary to unplug or rewire components to avoid post clashes. The table below shows the ports used on the Protoshield Plus - along with a comparison of ports used by a number of multifunction shields.
Rewiring
The Protoshield Plus manual is excellent, and provides the instructions for cutting traces to allow rewiring of port connections.
We suggest disconnecting the push button array from port A0, disconnecting the green and red LEDs from ports D11 and D12, and disconnecting the potentiometer (variable resistor) from port A1. PCB pins can be soldered to pads next to the cut traces. This allows the components to be connected to new ports using leads with female-male connectors - to avoid clashes with operation of ports on attached shields.
The default settings for the Protoshield Plus allow the use of the LCD display with an Arduino UNO compatible board as an I2C device on port 0x20 (decimal 32). The LCD display works well with the XOD/common-hardware node "text-lcd-16x2-i2c"


(http://www.gtronics.net/images/downloads/APSP/APSP_User_Manual_eng_3.pdf)
A series of free video tutorials for Arduino programming can be found here.
(https://www.youtube.com/playlist?list=PLA567CE235D39FA84)

XOD: Visual programming for the Arduino
We are adopting XOD as a simple platform for programming Arduino-based hardware. XOD is an open source platform that allows the graphical layout and assembly of software through connection of a series of nodes. XOD allows a hierarchical and dataflow driven approach, avoids the complexities of text management and syntax, and can be used to directly programme Arduino boards. We use XOD for our training programmes. The software can be downloaded from: (https://xod.io)
ARDX Prototyping Kit
The ARDX Starter Kit for Arduino is a great learning resource with components to build 13 different projects. The kit provides a manual with instructions arranged as a series of lessons. These provide a simple way of learning how to wire electronic circuits and programming the Arduino microcontroller. For example, the kit comes complete with a set of paper circuit templates that you lay over the breadboard and push the components through - to remove the worry of wiring the project incorrectly. No experience necessary!
The ARDX manual can be downloaded from here.
(http://www.seeedstudio.com/document/pdf/ARDX-02-WO-EG-SEEE-WEB.pdf)
Further technical information about the kit can be found here.
(https://www.seeedstudio.com/ARDX-The-starter-kit-for-Arduino-p-1153.html)
Grove Modular Sensor/Actuator Kit
Grove is a modular electronics platform for Arduino-based quick prototyping that does not involve soldering. Simply plug the Grove modules into the Grove shield and leverage the example code provided for each Grove module. Grove is a modular, ready-to-use tool set. Much like Lego, it takes a building block approach to assembling electronics. The Grove Starter Kit contains 10 of the most popular Grove modules and an Arduino shield with Grove connectors. Technical information, including code, can be found here.(http://wiki.seeed.cc/Grove_Starter_Kit_v3/)
Sidekick Basic Component Starter Kit
This contains basic components to build 7 different projects, and include an additional small circuit breadboard and more hook-up wire. The kit is provided by SeeedStudios, and technical information can be found here.(http://wiki.seeed.cc/Sidekick_Basic_Kit_for_Arduino_V2/).
4D Systems Programmable Touchscreen
The Biomaker Starter Kit will contain a 4D Systems 3.2" gen4 touch-responsive programmable display from 4D Systems (with memory card, Arduino interface and programmer), with information about programming environments. An Arduino library for direct serial communication with the display is available - along with more sophisticated Workshop4 development tools, including ViSi-Genie, a graphical programming tool that allows simple access to a wide range of display widgets like gauges, switches, sliders, readouts, etc., for creating customised interfaces for Arduino-based instruments. The programmable displays can be easily adapted for Raspberry Pi board computers.
Product page for 3.2" gen4 touch-responsive programmable display can be found here.(http://www.4dsystems.com.au/product/gen4_uLCD_32D/)
Information, including downloads for the 4D Systems Workshop4 development software for programming the displays can found here. Includes sophisticated widget-based design of custom interfaces.
(http://www.4dsystems.com.au/product/4D_Workshop_4_IDE)


Multifunction Arduino shields
In order to develop the 2018 tutorial sessions for the use of the XOD graphical programming environment, and control of Arduino-driven hardware - we explored the use of multifunction shields to simplify the training session - to minimise fiddly and error-prone wiring during the sessions. The use of these shields can introduce clashes between their devices and elements on the Protoshield Plus. Details of the ports used by the Protoshield Plus and various multifunction shields are shown below.

Shown above: Keyestudio Multi-Function shield V2 (£7.50), HAILANGNIAO Multi-Function shield V2 (£1.40), Open-Smart RTC shield (£8.00) and Keyestudio Multi-purpose shield V1 (£7.50). Each shield bears a range of components accessing a variety of Arduino ports (listed above. Some of these clash with ports already used on the Protoshield Plus. Happily, it is simple to rewire the ports. We suggest making the following changes to the default settings of the board.

Components:
Protoshield Plus: http://www.gtronics.net/en/products/arduino-proto-shield-plus
Available directly from Gtronics or via their Amazon storefront
Gtronics Facebook site with useful technical guides: https://www.facebook.com/ProtoShieldPlus/
UNO-compatible Arduino board: https://www.orangepipboards.com
Available from: https://www.rapidonline.com/orangepip-kona328-arduino-uno-compatible-development-board-75-0550
Keyestudio Multipurpose Shield V1: https://www.keyestudio.com/products/free-shippingkeyestudio-multi-purpose-shield-v1-for-arduino-starter
More technical details at: http://wiki.keyestudio.com/index.php/Ks0183_keyestudio_Multi-purpose_Shield_V1
Keyestudio Multi-Function shield V2: https://www.keyestudio.com/products/free-shipping-keyestudio-multi-purpose-shield-v2-w-gift-box-for-arduino-starter
More technical details at: http://wiki.keyestudio.com/index.php/Ks0184_keyestudio_Multi-purpose_Shield_V2
HAILANGNIAO Multi-Function shield V2: https://www.aliexpress.com/item/Multifunctional-expansion-board-kit-based-learning-for-UNO-r3-LENARDO-mega-2560-Shield/32845170467.html
Open-Smart RTC shield: https://www.aliexpress.com/item/For-Arduino-Expansion-Board-Clock-Shield-Wire-Digital-Module-SCM-Experiment-Original-Product-Blue-Black/1771823374.html
The Biomaker Challenge is sponsored by BBSRC/EPSRC through OpenPlant Synthetic Biology Research Centre (www.openplant.org) and the University of Cambridge Research Policy Committee through the Synthetic Biology Interdisciplinary Research Centre (www.synbio.cam.ac.uk).